Photography, as any art, not only requires the imagination element but also the technique, hence, the understanding of the theory behind it.
With this in mind, this article will explain the following concepts:
- The exposure of the picture,
- The aperture and the depth of field,
- The shutter speed,
- The ISO
The Exposure of the Picture
Think about exposure as the amount of light that reaches your camera sensor.
The exposure is controlled by three values:
- the Aperture,
- the Shutter Speed, and
- the ISO.
We will discuss each element later. The important thing here is that the combination of different values may have the same exposure values. In other words,
E(a1, s1, i1) = E(a2, s2, i2); where a1 and a2, s1 and s2 and i1 and i2 could have different values.
This means that you could take a photo using f/4, 1/200s, ISO 100 or f/4, 1/400s, ISO 200 and both photos would have the same exposure (mathematically speaking), however, depending on the photo, you may prefer the 1/400s combination if you are photographing a dog rather than a posing model.
The Aperture
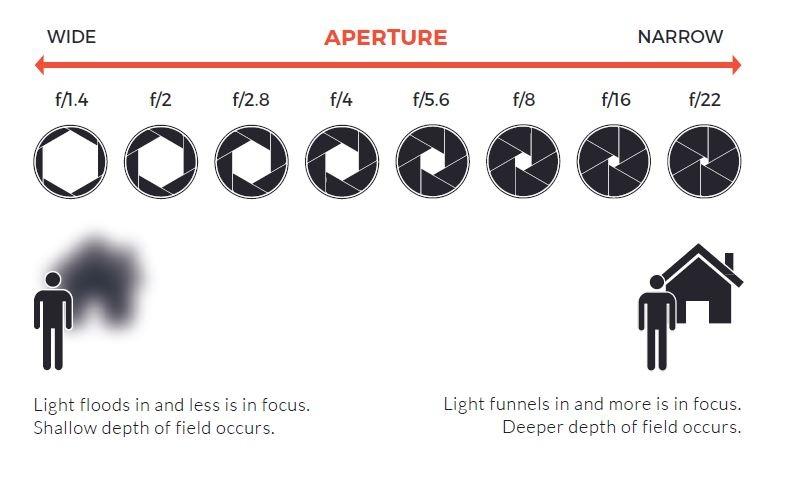
The aperture of a lens is the opening hole through which light passes into the camera.
You can see that photographers refer to the aperture as f/2 or f2. The value of f/2 means a wider aperture than the f/11 value. Why? Because the aperture is thought to be a fraction. The physical aperture of a 50mm lens at f/2 would be narrower than the f/2 on a 300mm lens.
Sometimes, you may listen to some photographers commenting they are using a "fast aperture" or a "fast lens". This is pure lingo, they are trying to say that the lens they are using can have a wide aperture (f/1 to f/4), and as a consequence, they can take pictures with higher shutter speeds.
Depth of Field
Have you noticed that in some photos, not every element is sharp? This is because of the Depth of Field (DoF).
The depth of field is the distance in an image where objects appear “acceptably in focus” or have a level of “acceptable sharpness".
The DoF is controlled by two elements: the Aperture and the distance between the camera and your objects of focus. Follow these rules:
- The wider the aperture is, the narrower the DoF will be, and the closer the aperture will be. An f/2 will have a narrow depth of field compared with an f/11 if the camera and the object have the same distance.
- The closer the camera is to the object, the narrower the DoF will be. A lens with f/2 focusing an object 1 meter away will have a narrower depth of field than using the same lens, same aperture but focusing an object 10 meters away.

Because the distance to the subjects of your picture changes the composition, you usually don't listen to photographers discussing about the distance to the subject. What you listen to is discussing the aperture; the aperture doesn't change the composition of your photo.
This begs the question, what would be my best aperture? This is an artistic decision, however, from the technical point of view, your aperture should be wide enough to cover your subjects. You could download some photography applications, such as Photography Companion to do such calculations. With practice, you will learn those values by heart.
For example, on a 50mm lens, with f/4 and being 3 meters away from your subject, you have approximately 87 cm of depth of field.
So, why don't you use an aperture of f/22 and forget about this? Well, there are several reasons why you shouldn't.
- To compensate for the exposure, you would have to slow your shutter speed down or raise the ISO. If you are photographing a moving subject, a slow shutter speed will create an undesirable ghost effect. if you raise the ISO too much, you may end with too much digital noise to the point the photo would be unacceptable.
- And maybe the most important, you will have diffraction. Diffraction is the optical effect that makes the lights shine like stars (which sometimes is a desired artistic effect), but you will also lose sharpness.
The Shutter Speed
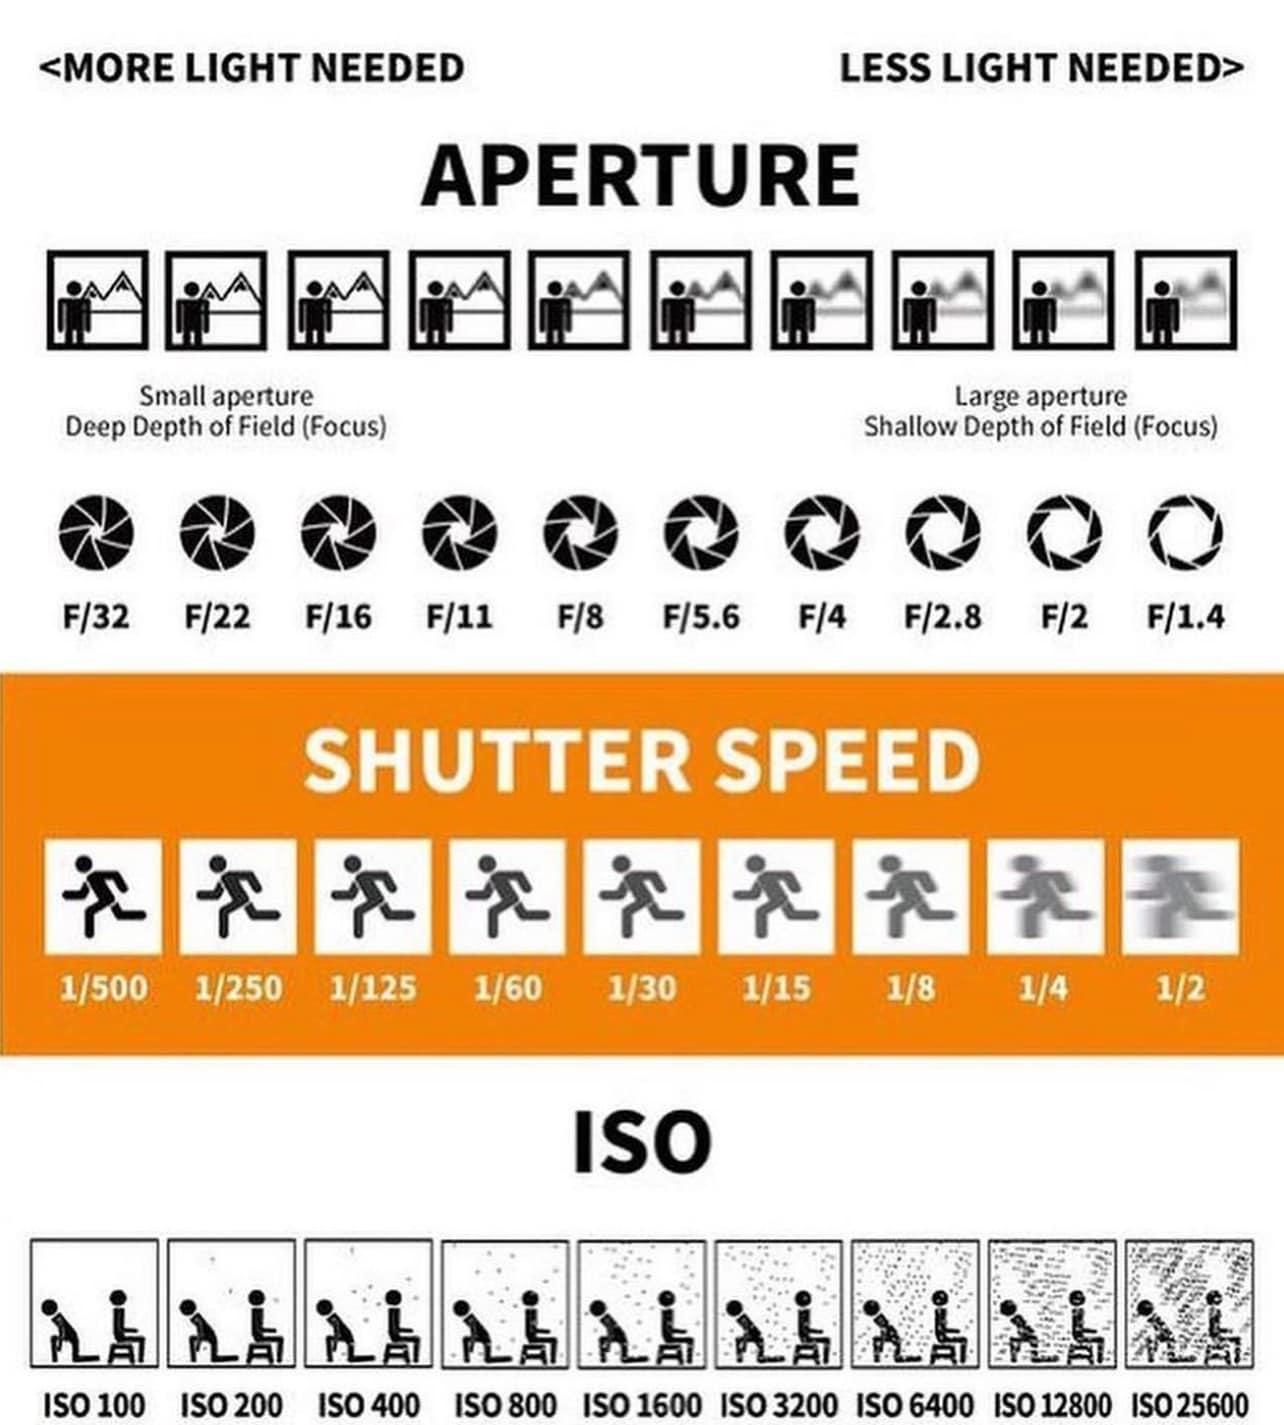
The shutter speed controls the time that the light is allowed to pass through the lens and be captured by the camera sensor.
You may want to use a higher shutter speed (1/500 s or higher, depending on your subject) for moving objects, medium shooter speed (1/160 s) for living yet static subjects (such as a portrait), or very slow shutter speeds for still objects. By practicing you will learn what speed setting to use depending on your subject.
The faster the shutter speed is, the less light will pass through. Then, you will have to compensate for this by making your aperture wider or raising your ISO.
The ISO
The ISO controls how the sensitivity of your sensor to the light.
A higher ISO will let you capture things in the dark. However, there is a trade-off; the higher the ISO value is, the more digital noise you will have to the point the photo will be unacceptable.
The maximum acceptable ISO changes depending on the lighting conditions. Usually, the maximum for low-light scenes is much lower than for bright scenes. You will have to do tests to find these values on your camera. Older cameras are more noisy than the latest models.
For example, in a Canon R6, an ISO of 4000 on low-light scenes is still acceptable, and an ISO of 8000 on bright scenes works without major issues. This doesn't mean you will shut using your ISO to the maximum acceptable, but it allows you to know when to stop shutting.
Keep your ISO as low as possible.
Finding the Balance
At this point, you now understand the three elements of the exposition and how they affect the final photography. You will have to decide, with a lot of practice what values to use.
- If your subject is a fast-moving object (such as a car), you may want to start at a shutter speed of 1/1000 s, and depending on the scene conditions, maybe use a wide aperture and an ISO below the point of making the photo unacceptable.
- If your subject is still (product photography or real estate photography), you may want to find an aperture narrow enough to have a wide depth of field, keep your ISO as low as possible and let the shutter speed as slow as possible to have a nice exposure.
Only practice and knowing the gear you have will help you to make a faster decision.
